massXpert2 User Manual
4 XpertEdit: a Powerful Editor and Simulation Center
- 4.1 XpertEdit Invocation
- 4.2 XpertEdit Operation: In Medias Res
- 4.3 The Editor Window Menu
- 4.4 Editing Polymer Sequences
- 4.5 Finding sequence motifs
- 4.6 Importing Sequences
- 4.7 Multi-region Selections
- 4.8 Polymer Sequence Modification
- 4.9 Monomer Cross-linking
- 4.10 Sequence Cleavage
- 4.11 Oligomer Fragmentation
- 4.12 Mass Searching
- 4.13 Oligomer Data Filtering
- 4.14 m/z Ratio Calculations
- 4.15 Monomeric And Elemental Composition
- 4.16 pKa, pH, pI and Charges
- 4.17 General Options
After having completed this chapter you will be able to perform sophisticated polymer chemistry simulations on polymer sequences—that can be edited in place—along with automatic mass recalculations.
4.1 XpertEdit Invocation #
The XpertEdit module is easily called by pulling down the menu item from the massXpert2 program's menu. The user may start the XpertEdit module by:
Opening a sample polymer sequence;
Creating a new polymer sequence;
Loading a polymer sequence from disk.
4.2 XpertEdit Operation: In Medias Res #
The first manner to start an XpertEdit session is by opening a sample sequence out of the list of sequences that were shipped along with massXpert2. The menu item from the menu opens the dialog box shown in Figure 4.1, “Selection of a sample polymer sequence”. The drop-down widget in this dialog window lists all the polymer sequence files that were shipped along with massXpert2. Simply select one item and click OK. To select another polymer sequence file, click Cancel, which will trigger the system's file selection dialog for you to browse to the location where the polymer sequence file is stored. The process is identical to the normal polymer sequence file opening (see below).
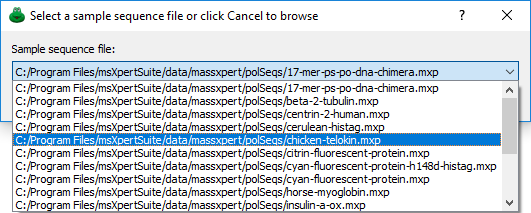
massXpert2 ships with a number of sample polymer sequences which are designed to allow an easy demonstration of the XpertEdit features. This selection dialog lists all the polymer sequence files that were shipped along with massXpert2.
Figure 4.1: Selection of a sample polymer sequence #
The second way to start an XpertEdit session is by creating a new polymer sequence ( menu item from the menu). The program immediately asks to select a polymer chemistry definition, as shown in Figure 4.2, “Selection of the polymer chemistry definition”. The drop-down widget lists all the polymer chemistry definitions currently registered on the system. If the polymer chemistry definition is not listed, clicking onto Cancel will let the user browse the disk in search for a polymer chemistry definition file[7]. Once the polymer chemistry definition has been selected and successfully parsed by the program, the user is presented with an empty sequence editor.
The third way to start an XpertEdit session is by opening an existing polymer sequence file. Once the sequence file has been opened, the user is presented with a sequence editor as represented in Figure 4.3, “The XpertEdit main window”. At this point, when the user starts editing a sequence, the characters entered at the keyboard, or pasted from the clipboard, will be interpreted using the polymer chemistry definition that was selected in the initialization window described above.

When creating a new polymer sequence, it is necessary to first indicate of what polymer chemistry definition the polymer sequence will be. This window lists all the polymer chemistry definitions currently available on the system.
Figure 4.2: Selection of the polymer chemistry definition #
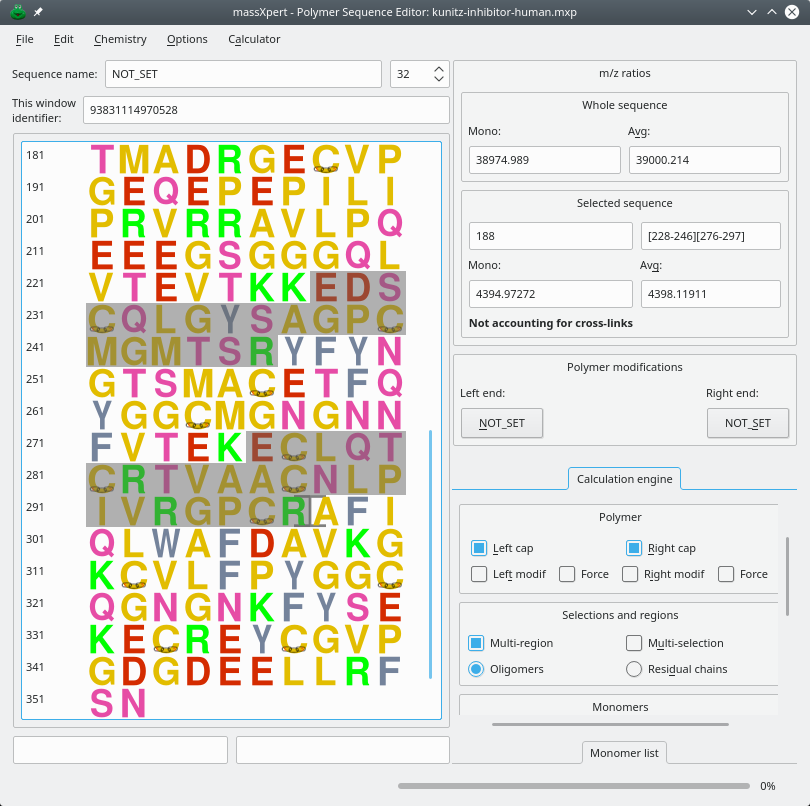
This figure shows a polymer sequence displayed in an XpertEdit editor window.
Figure 4.3: The XpertEdit main window #
Now, of course, editing a polymer sequence is not enough for a mass spectrometric-oriented software suite; what we want is compute masses! The mass calculation process is immediately visible on the right hand side of the sequence editor shown in Figure 4.3, “The XpertEdit main window”. The m/z ratios frame box widget contains two items:
Whole Sequence A frame box widget displaying the Mono and Avg masses of the whole polymer sequence, irrespective of the current selection;
Selected Sequence A frame box widget displaying the Mono and Avg masses of the currently selected region of the polymer sequence.
The user may change the mass calculation engine configuration at any point in time using the widgets in the Calculation Engine tool box that contains the following configurable parameters:
Polymer
If Left Cap is checked, the left cap of the polymer sequence will be taken into account;
If Right Cap is checked, the right cap of the polymer sequence will be taken into account;
If Left Modif is checked, the modification of the polymer sequence's left end will be taken into account. Note that if Force is checked also, then the modification is taken into account even when selecting a region of the sequence that does not encompass the monomer located at that end;
The behaviour of Right Modif is the same as above, but for the right end modification;
Selections and regions
If Multi-region is checked, the sequence editor allows more than one region to be selected at any given time (there is no limitation whatsoever on the number of selected regions);
If Multi-selection is checked, the sequence editor allows not only the selection of multiple regions at any given time, but also the selection of totally or partially overlapping regions.
When multiple regions are selected, each selected region behaves like an oligomer if Oligomers is selected; that is, it gets its left and right end caps added (if the corresponding calculation engine configuration item is activated);
When multiple regions are selected, the different regions behave like residual chains if Residual chains is selected; that is, the left and end caps are added only once (if the corresponding calculation engine configuration item is activated).
Monomers
If Modifications is checked, the monomer modifications will be taken into account;
If Cross-links is checked, the cross-links in the polymer sequence will be taken into account.

Warning
Only cross-links fully encompassed by the selected sequence region(s) will be taken into account for the Selected sequence mass calculations. If any number of cross-links are not fully encompassed by the currently selected sequence region, then that number is displayed along with the following label visible in the Selected sequence group box : Incomplete cross-links:.
Ionization
The +H formula represents the ionization agent formula (that is, a protonation);
The Unitary charge value is set to 1 because, in the example, a protonation brings a single positive charge;
The Ionization level set to 1, that is, in the example, the polymer must undergo a single protonation.
When any parameter listed above is changed, the recalculation of the masses—for both the Whole sequence and the Selected sequence—is triggered and the new masses are updated in their respective line edit widgets, described earlier. The fact that the user can specify ionization rules should make it clear that the values that are displayed are actually m/z ratios (as long as one ionization is required).
4.3 The Editor Window Menu #
The menu bar in the polymer sequence editor displays a number of menu items, reviewed below:
→: close the sequence;
→: save the sequence under a new file name. If the sequence has no filename yet, the user is invited to select a filename;
→: save the sequence in a new file;
→: try to import the sequence. If invalid monomer code characters are found, the user is given a chance to revise the imported sequence;
→: copy the sequence and all the data (masses and calculation options) to the clipboard, in the form of simple text;
→: write the sequence to file and all the data (masses and calculation options), in the form of simple text (if a file name was already selected, otherwise the user is invited to select a file into which the data are to be written);
→: select a file into which the data are to be written.
Edit
→ Copies the current selected region(s) (if any) to the clipboard. If there are more than one region currently selection, then the user is informed that the copied sequence will correspond to these two sequences joined together.
Warning
Be aware, that the order in which the region sequences are joined is the order in which the regions were selected, and not the order in which the sequences appears in the whole polymer sequence.
→ copy the current selection (if any) to the clipboard and removes it from the sequence. Note that it is not yet possible to cut more than one selected region in one single operation;
→: paste the sequence from the clipboard into the sequence at the current cursor location. If the pasted sequence is found to contain characters not valid for the current polymer chemistry definition, the user is given a chance to revise the pasted sequence. If one sequence region was selected, it is replaced with the pasted sequence. If more than one sequence region was selected, the operation cannot be performed and the user is informed;
→: find a sequence motif in the polymer sequence.
→: modify (or unmodify) one or more monomers in the polymer sequence;
→: set (or unset) the left (or right, or both) modification(s) of the polymer sequence;
→: cross-links monomers;
→: perform a chemical/enzymatical cleavage of the polymer sequence;
→: perform the gas phase fragmentation of the currently selected oligomer;
→: search in an arbitrary manner for any sequence having a mass matching the searched mass;
→: calculate a range of m/z ratios with a given ionization agent starting from a given m/z ratio and a given ionization status;
→: calculate the monomeric/elemental composition of the whole polymer sequence or of the current selection;
→: perform acidity, pH and isoelectric point calculations on the whole sequence or on the current selection.
→: set the number of decimal places to be used to display the numerical values.
4.4 Editing Polymer Sequences #
As described earlier, in the chapter about the XpertDef module, a polymer chemistry definition may allow more than one character to qualify the codes of the monomers (see Chapter 3, XpertDef: Definition of Polymer Chemistries). It was noted also that it is not because the number of allowed characters is 3, for example, that all the monomer codes of the polymer chemistry definition must be defined using three characters: 3 is the maximum number of characters that may be used.
4.4.1 Multi-Character Monomer Codes #
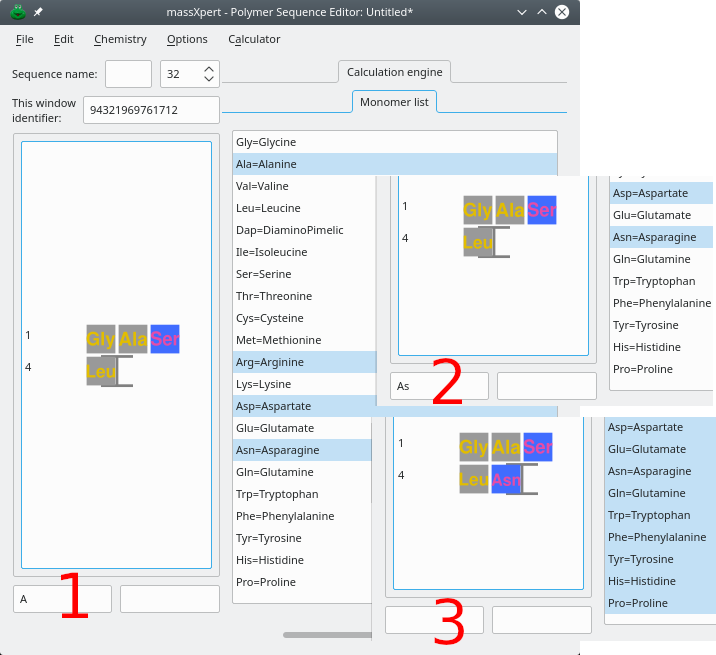
This figure shows the process by which a multi-letter monomer code is entered in the polymer sequence editor.
Figure 4.4: Multi-character code sequence editing in XpertEdit #
This section deals with the editing of a polymer sequence for which monomer codes can be made of more than one character. Figure Figure 4.4, “Multi-character code sequence editing in XpertEdit” shows the case of a polymer sequence for which the polymer chemistry definition allows three characters to define monomer codes. The example is based on the following real-world situation: the user wants to edit the sequence by insertion—at the end of the sequence (right of the Leu residue). The new monomer to be appended to the sequence is “Asn”.
After keying-in A (panel 1), no sequence modification is visible in the sequence editor. Instead, an “A” character is now displayed in the left line edit widget under the sequence. The reason of this apparently odd behaviour is that the polymer chemistry definition allows up to 3 characters to describe a monomer code. If no monomer vignette is displayed in the polymer sequence, that means that more than one monomer code start with an “A” character: XpertEdit cannot figure out which monomer code was actually meant by the user when keying-in A.
There is a way, called code completion, to know which monomer code(s)—in the current polymer chemistry definition—do start with the keyed-in character(s) (currently, “A”). The user can at any moment always enter the “code completion mode” by hitting the Enter key. This is what is shown in the panel 1st, right hand side Monomer List listview widget (click on that Monomer List label to show that list if it is not already visible). We see that, in the current polymer chemistry definition, four monomer codes start with an “A” character, and these are “Ala”, “Arg”, “Asp” and “Asn” (as highlighted in the code completion monomer list).
Because we now know that the code we are to key-in is “Asp”, we key-in a s. The result is shown in the small panel 2. What we see here is that, this time also, nothing changed in the polymer sequence. What changed is that the character string in the left line edit widget below the sequence is now “As”. Let's key-in once more the Enter key. This time, only two items are highlighted: “Asp” and “Asn” in the code completion monomer list (panel 2nd). This is easily understood: there are only two monomer codes that start with the two letters “A” and “s” (“As”) that we have keyed-in so far. At this time, we key-in a last character: n. At this point, the monomer is effectively inserted in the polymer sequence, as the “Asn” monomer left of the cursor, as shown in panel 3. Note how the bottom edit widget is now cleared: the re are no more letters in the buffer awaiting to be completed to form a full monomer code. Also, by entering Enter, all the monomer codes are selected in the list of monomer codes available for editing the sequence: since a new monomer code might be entered all possibilities are open.
4.4.2 Unambiguous Single-/Multi-Character Monomer Codes #
Let's imagine that we have a polymer chemistry definition that allows up to 3 characters for the definition of monomer codes, but that we have one of these monomer codes (let's say the one for the “Glutamate” monomer) that is one-letter-long: “E”. This monomer code “E” is the only one in the polymer chemistry definition to start with an “E” character. In this case, when we key-in E, we'll observe that the monomer code is immediately validated and that its corresponding monomer vignette is also immediately inserted in the polymer sequence. This is because, if there is no ambiguity, XpertEdit will immediately validate the code being edited.
The mechanism described above means that the user is absolutely free to define only single-character monomer codes in a polymer chemistry definition that allows multi-character monomer codes; the behaviour of the program is thus to behave exactly as if the multi-character code feature were inexistent in the program: each time a new uppercase letter is keyed-in, it is automatically validated and the corresponding monomer is created in the sequence.
4.4.3 Erroneous Monomer Codes #
The typing error detection system triggers immediate alerts whenever the code beign keyed-in is incorrect. This is described in Figure 4.5, “Bad code character in XpertEdit sequence editor”. If the user enters an uppercase character not matching any monomer code currently defined in the polymer chemistry definition, or a lowercase character as the first character of a monomer code, the program immediately complains in the right line edit widget below the sequence. In this case, the monomer code is not put into the left text widget, which means it is simply ignored.

This figure shows the feedback that the user is provided by the code editing engine, when a bad character code is keyed-in.
Figure 4.5: Bad code character in XpertEdit sequence editor #
If you start keying-in valid monomer character codes, like for example we did earlier with “As”, and you want to erase these characters because you changed your mind, hit the Esc key to remove any character entered previously. These characters will disappear sequentially, at each Esc key press, from the line edit widget below the sequence. For example, let's say you have already keyed-in A and s. In this case the left line edit widget displays these two characters: “As”. Now, if you change your mind, not willing to enter “Asp” monomer code anymore, but “Gly” instead, all you have to do is to key-in Esc once for the “s” character (which disappears) and once more to remove the remaining “A” character. At this point it is possible to start fresh with the “Gly” monomer code by keying-in sequentially G, l and finally y.
Warning
Do not use the <— key to erase erroneously entered characters, you would delete monomers from the sequence!
4.4.4 Simplified Editing #
When the monomer codes of a given polymer chemistry definition are too numerous or too long to remember, one simplified editing strategy is by using the list of available monomers located on the right side of the sequence editor (widget labelled Monomer list). The items in the list are active: if double-clicked, an item will see its corresponding monomer code inserted in the sequence at the current cursor location. This list thus makes it easy to “visually” edit the polymer sequence without having to remember all the codes in the polymer chemistry definition.
4.5 Finding sequence motifs #
Finding sequence motifs in the polymer sequence is performed by selecting the → menu item. The dialog window is shown in Figure 4.6, “Finding a sequence motif in the polymer sequence”. When performing the first search in a polymer sequence, the button should be used. This will trigger a search starting at the beginning of the polymer sequence. For each successive search, the button should be used.
Each searched sequence motif will be stored in a history list that is made available by dropping down the combo box widget where the sequence motif is entered. The button will erase all the searched sequence motifs from the history, thus resetting it.
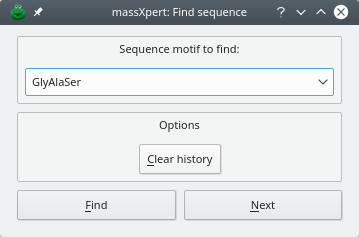
The first iteration should be performed by clicking onto the button, and each following iteration should be performed using the button.
Figure 4.6: Finding a sequence motif in the polymer sequence #
4.6 Importing Sequences #
Very often, the user will make a sequence search on the web and be provided with a polymer sequence that is crippled with non-code characters. That web output might either be saved in a text file for future reference or copied to the clipboard for immediate use in massXpert2. The two cases are reviewed below.
4.6.1 Importing From The Clipboard #
XpertEdit provides a convenient way to spot non-valid characters in a text and to let the user “purify” the imported sequence. A clipboard-imported sequence is systematically parsed. When invalid characters are found, the window depicted in Figure 4.7, “Clipboard-imported sequence error-checking” is presented to the user for her to make appropriate adjustments (in this example we tried to copy from clipboard the following sequence: “!100 ATGCATGC ATGCATGC ATGCATGC ATGCAUGC anotherSilly-Text;”).
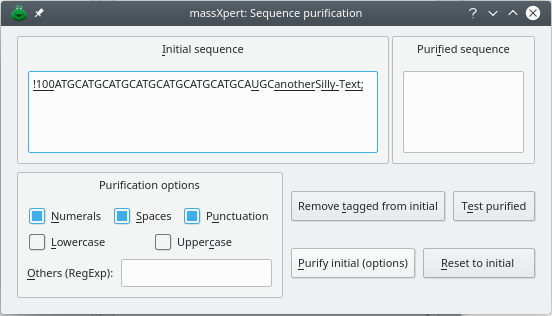
If a sequence that is imported through the clipboard to the XpertEdit sequence editor contains invalid characters, the user is provided with a facility to “purify” the sequence. This facility is provided to the user through the window depicted in this figure.
Figure 4.7: Clipboard-imported sequence error-checking #
As soon as a character does not correspond to any valid monomer code, it is tagged, and the sequence is presented to the user in a text edit widget (Initial Sequence) with the all the invalid characters tagged by underlining. At that point, if the user clicks the button, all the tagged characters will be automatically removed and the purified sequence will show up in the Purified Sequence text edit widget.
Also, the user is provided with automatic “purification” procedures whereby it is possible to remove one or more classes of characters from the imported sequence (Purification Options frame widget). Checking one or more of the Numerals or Spaces or Punctuation or LowerCase or Uppercase checkbuttons, or even entering other user-specified regular expressions in the Other (RegExp) line edit widget, will elicit their removal from the imported sequence after the user clicks the button.
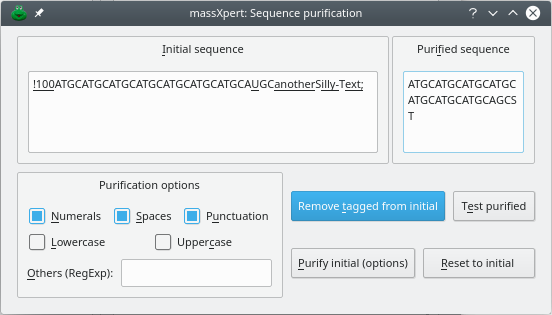
There are a number of ways to purify a sequence. Here the button was clicked. The purified sequence shows up in the Purified Sequence text edit widget.
Figure 4.8: Clipboard-imported sequence purification #
When you are confident that almost all the erroneous characters have been removed (Figure 4.8, “Clipboard-imported sequence purification”), you can click the button, which will trigger a “re-reading” of the sequence in the Purified Sequence text edit widget. If erroneous characters are still found, they are tagged.
Note
For maximum flexibility, you are allowed an immediate and direct editing of the purified sequence in the Purified Sequence text edit widget (that is, that text edit widget is not read-only).
Once the sequence if finally depured from all the invalid characters, you can select it in the text edit widget and paste it in the XpertEdit sequence editor. This time, the paste operation will be error-free.
4.6.2 Importing From Raw Text Files #
It might be of interest to be able to import a sequence from a raw file. To this end, the user is provided the menu → that opens up a file selection window from which to choose the file to import. The program then iterates in the lines of that file and checks their contents for validity. If errors are found, then the same process as described earlier for clipboard-imported sequences is started (Section 4.6.1, “Importing From The Clipboard”). The user can then purify the sequence imported from the file and finally integrate that sequence in the polymer sequence currently edited. Note that if any sequence portion is currently selected, it will be replaced by the one that is being imported.
4.7 Multi-region Selections #
massXpert2 implements a sophisticated multi-region selection model. Two selection modes are available:
Multi-region selection mode: In this mode, it is possible to select more than one region in the polymer sequence. In all cases below, make sure that the Multi-region checkbutton is checked in Selections and regions group box. This is how these selections are performed:
With the mouse: Left-click and drag to make the first selection. Go with the mouse cursor at the beginning of new selection, hold the Ctrl key down while left-clicking and dragging to perform the second region selection. Continue as may times as necessary;
With the keyboard: Position the cursor at the beginning of the first region to be selected, hold the Ctrl–Shift keys down while moving the cursor with the direction keys (the arrow keys of the keyboard). Hold the Ctrl key down and use the direction keys to go to the beginning of the new region selection, press the Shift key and hold it down while moving the cursor with the direction keys to actually perform the region selection.
Multi-selection region mode: In this mode (which requires the multi-region selection mode to be enabled), it is possible to perform selections that overlap. For example, one could select the sequence “MAMISGM” and then select the sequence “SGMSGRKAS”. The overlapping sequence is thus “SGM”.
Being able to select multiple regions and/or to select multiple times the same region involves some configurations, as far as calculating relevant masses is concerned. Indeed, whatever the selection mode that is enabled, each time one selection (overlapping with another or not) is added or removed, masses are recalculated for the current selection[8]. The way the multi-region selections and the multi-selection regions are handled, from the mass calculation standpoint, is configured as follows:
Regions are oligomers: In this configuration, each selection behaves as an oligomer, and thus should normally be capped on both its left and right ends. This is typically the situation when the user wants to simulate the formation of a cross-linked species arising from the cross-linking of two oligomers: each oligomer is capped on both its ends;
Regions are residual chains: In this configuration, each selection behaves as a residual chain, and thus the oligomer resulting from the multi-region selections is capped on its left and right ends only once. This situation is typically encountered when simulating partial cleavages by first selecting an oligomer, checking its mass and then continuing selection to simulate a longer oligomer resulting from a partial cleavage. Also, the situation might be encountered when there are multiple repeated sequence motifs in a polymer sequence and mass data are difficult to analyze.
4.8 Polymer Sequence Modification #
It very much often happens that (bio) chemists use chemical reactions to modify the polymer sequence they are working on. Mass spectrometry is then often used to check if the reaction proceeded properly or not. Further, in nature, chemical modifications of biopolymer sequences are very often encountered. For example, protein sequences get often modified as a means to regulate their function (phophorylations, for example, or acetylations, methylations…). Nucleic acid sequences are very often and extensively modified with modifications such as methylations…
It is thus crucial that massXpert2 be able to model with high precision and flexibility the various chemical reactions that can be either made in the chemistry lab or found in nature. The massXpert2 program provides two different chemical modification processes:
A process by which monomers belonging to the polymer sequence can be individually modified;
A process by which the whole polymer sequence can be modified, either on its left end or on its right end or even on both ends.
4.8.1 Selected Monomer(s) Modification #
There are a number of manners in which monomers can be modified in a polymer sequence. Figure Figure 4.9, “Modification of a monomer in a polymer sequence” shows the simplest manner: the user first selects the monomer vignette to be modified and calls the → menu. A window shows up where all the modifications currently available in the polymer chemistry definition are listed. Because a monomer vignette was initially selected in the editor window, the Selected Monomer target radiobutton is on by default.
Note
Note that if a sequence was selected when the monomer modification task was started, then, selecting Current selection would be required to modify all the monomers in the selection. Alternatively, if this is not what is required, re-selecting the right monomer in the sequence and selecting Current selection will ensure the modification applies only on the currently selected monomer.
It is then simply a matter of choosing the right modification from the Available modifications list and clicking onto the button. The target(s) of a given modification (as selected in the Target frame widget) can be identified according to:
The Selected Monomer frame will display data in its two line edit widgets if a single monomer vignette was selected at the time the monomer modification action was invoked (exactly as in Figure 4.9, “Modification of a monomer in a polymer sequence”).
Warning
Only the monomer of which the code and the position are displayed will be modified (even if it is no more selected or if the sequence has changed and the monomer at the displayed position is not the same anymore).
If the Current Selection radiobutton widget is selected, the modification should be performed on all the monomers that are currently selected, that is, if the selection changed after the modification window was displayed, the new selection is modified, not the old one;
If the Monomers Of Same Code radiobutton widget is selected, all the monomers in the sequence that have their code identical to the one shown in the Current selection line edit widget are modified;
If the Monomers From The List radiobutton widget is selected, all the monomers in the polymer sequence having a code corresponding to any code selected in the Available Monomers list are modified;
If the All Monomers radiobutton widget is selected, all the monomers of the polymer sequence are modified;

This figure shows how the chemical modification of monomer(s) can be performed.
Figure 4.9: Modification of a monomer in a polymer sequence #
Note that there is one checkbox widget (Override target limitations) that requires explanation. In the chapter about the definition of polymer chemistries (Chapter 3, XpertDef: Definition of Polymer Chemistries) the definition of modifications was detailed, and the “target” notion was explicited. If, during a monomer modification, massXpert2 detects that the user is trying to modify a monomer that is not a target of the modification at hand, it will complain, as shown in the Messages text edit widget of Figure 4.9, “Modification of a monomer in a polymer sequence”). In this example, indeed, the user tried to modify monomer Leucine with Phosphorylation, which is not possible because modification Phosphorylation has been defined a not having monomer Leucine as any of its targets. Another situation where target limitations might show up, is when trying to modify a monomer more than authorized by the Max. count number of times that monomer might be modified at once with that modification. For example, when working of methylation of proteins, it might happen that lysyl residues get methylated more than one at a time (tri-methylation occurs often in histones). If the chemical modification was defined in XpertDef with a max count of 2 and a third chemical modification is asked on a given target monomer, then the program refuses to perform the modification. To override this limitation, check the Override target limitations checkbox widget.
The general concept about this is : the Override target limitations checkbox widget is unchecked by default so that the user does not do mistakes without knowing. However, flexibility is desirable, and that checkbox widget can be checked if required.
As a result of the monomer modification, the monomer vignette gets
modified. Figure 4.9, “Modification of a monomer in a polymer sequence” shows one
phosphorylated Seryl residue at position 13: a transparent graphics
object (a red “P”) was overlaid onto the corresponding
seryl monomer vignette. If the user modifies a monomer with a
modification that has no corresponding SVG-formatted
file defined for its graphical rendering in file
modification_dictionary, then a default
modification rendering is used.
The user is responsible for correctly reading the messages that might be published in the Messages text edit widget. It is important to understand that, when a monomer is modified, its previous modification (if any) is overwritten with the new one. The user is invited to experiment a bit with the monomer modification process, so as to be confident of the results that she is going to obtain when real polymer chemistry work is to be modelled in massXpert2.
Tip
If the modification to be applied is not readily available in the list of modifications defined in the polymer chemistry definition, then it is possible, by checking the Define modification check button widget to manually define a modification. This procedure leads to the modification of the target monomer(s) exactly as if the modification had been selected from the list of available modifications. But, because the modification has a name not known to the polymer chemistry definition, the editor cannot modify the monomer vignette with a predefined transparent raster image. Thus, as seen on Figure 4.10, “Rendering of a monomer modification in a polymer sequence”, the modified residue gets visually modified using the default transparent raster image (4 interrogation marks, one at each corner of the monomer vignette square).

This figure shows how the chemical modification of monomer(s) is graphically rendered. The “S” residue is modified using an “Phosphorylation” modification. The “I” residue is modified with a modification that has no associated graphical vignette. The default vignette is thus used.
Figure 4.10: Rendering of a monomer modification in a polymer sequence #
It is perfectly feasible to modify a single monomer more than once (with the same modification or not ; for example a tri-methylation with a methylation modification). This is why when the window depicted in Figure 4.9, “Modification of a monomer in a polymer sequence” shows up, the two lists at the right hand side show the monomers currently modified and the modification(s) that are currently set to these modified monomers. Selecting one item from the Modified monomers list will show only the modifications set to that monomer in the Modifications list. If all the modifications in the polymer sequence are to be displayed then, checking the All modifications check box widget will trigger the display of all the modifications set to any monomer in the whole polymer sequence.
Unmodification of monomers is easily performed by selecting any number of items from the Modifications list and clicking the button.
Warning
It should be noted that once a monomer modification dialog window has been opened, the polymer sequence should not be edited. This is because the modification/unmodification process takes for granted that the polymer sequence is still identical to what it was when the monomer modification dialog was opened. Mecanisms are there to ensure that the irreparable does not happen, but this warning is in order.
4.8.2 Whole Sequence Modification #
As described above, it is possible to modify any monomer in the polymer sequence; when any modified monomer is removed, the modification associated to it goes away with it. The modifications that we describe here are not of this kind. They can be applied either to the left end of the polymer sequence or to its right end (or both). But these modifications do belong to the polymer sequence per se and are not removed from it—even if the polymer sequence is edited by removing the left end monomer or the right end monomer. This is why these modifications are polymer modifications and not monomer modifications.
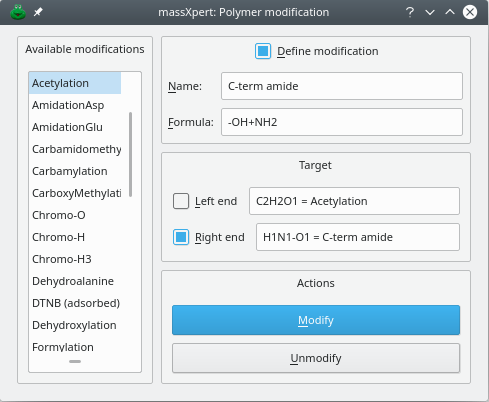
This figure shows how simple it is to permanently modify a polymer sequence on either or both its left/right ends.
Figure 4.11: Modification of the left end of a polymer sequence #
The way in which a polymer sequence is modified using polymer modifications is much easier than the previous monomer modifications case. The modification window is opened by choosing the → menu. The Figure 4.11, “Modification of the left end of a polymer sequence” shows that window. The modification is absolutely easy to perform, with a clear feedback provided to the user (by listing the permanent modifications in two line edit widgets located in front of the Target checkbuttons Left End and Right End.
If a formally-defined modification is not available, you can define manually the modification that is needed (check the Define modification checkbox to that effect) and then apply to the polymer end of interst. This is illustrated in Figure Figure 4.11, “Modification of the left end of a polymer sequence” for the C-terminal end (the right end) of the protein. The modification object used is created on-the-fly by the program and gets saved in the file as if the user had selected a modification out of the list of available modifications. In the example, the polymer sequence was modified on its left end using the “Acetylation” modification available in the polymer chemistry definition and was amidated (formula -OH+NH2) with a manually-defined modification called C-term amide. The polymer sequence editor window displays the left end and right end modifications as labels of buttons located in the Polymer modifications groupbox widget.
4.9 Monomer Cross-linking #
A cross-link is a covalent bond that links a monomer with one or more other monomer. A monomer might be cross-linked more than once. The dialog window in which the user might define cross-links is shown in Figure 4.12, “Cross-linking of monomers”.
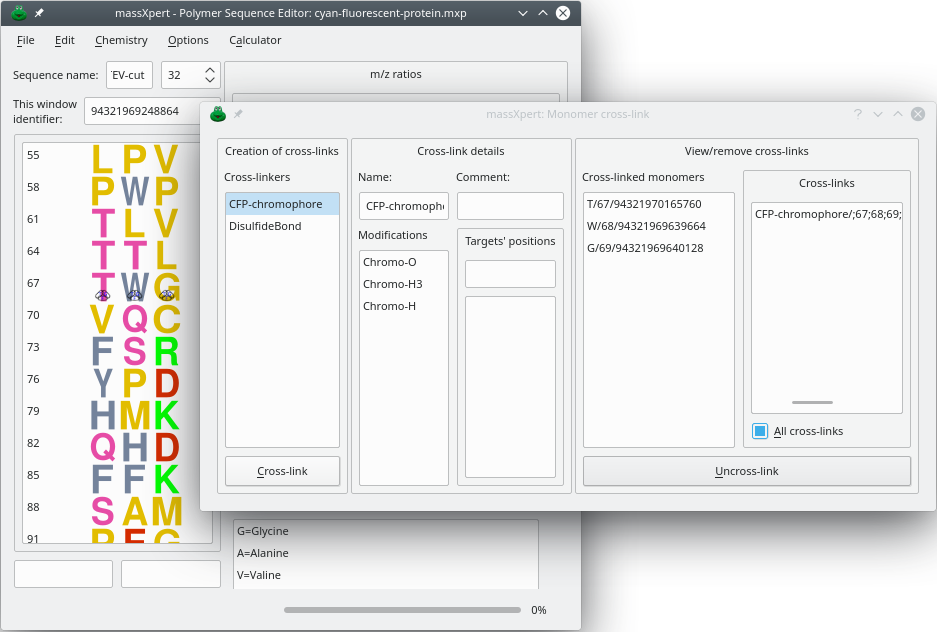
This figure shows the window in which monomers can be cross-linked together. A cross-link (as defined in the current polymer chemistry definition) is selected and the targets are specified in the Targets' positions text line edit widget in the form of monomer positions separated by “;” semicolumns.
Figure 4.12: Cross-linking of monomers #
Cross-linkers were defined in the section about XpertDef (see page Section 3.2.3, “ The cross-linkers”). A cross-linker might either define no modification to be applied to the cross-linked monomers or the same number of modifications as there are monomers cross-linked. For example, fluorescent proteins have a chromophore that is made by reaction of three residues (Threonyl [or Seryl]–Tryptophanyl [or Tyrosinyl or Phenylalanyl]–Glycyl), as shown in Figure 4.12, “Cross-linking of monomers”. When cross-linking with the fluorescent protein cross-linker, there must be three monomers involved as these are three modifications defined in the cross-linker.
When any monomer involved in a cross-link is edited off a polymer sequence, the cross-link(s) it was involved in are automatically dissolved and destroyed. Destruction of a cross-link might be performed by selecting the cross-link in the Cross-links list widget at the right hand side of the dialog window depicted in Figure 4.12, “Cross-linking of monomers” and by clicking the button.
4.10 Sequence Cleavage #
It happens very often that polymer sequences get cleaved in a sequence-specific manner. These specific cleavages do occur very often in nature, and are made by enzymes that do cleave biopolymer sequences, like the glycosidases (cleaving saccharides), the proteases (cleaving proteins) or the nucleases (cleaving nucleic acids). But the scientist also uses purified enzymes or chemicals to perform such cleavages in the test tube. massXpert2 must be able to perform those cleavages in silico.
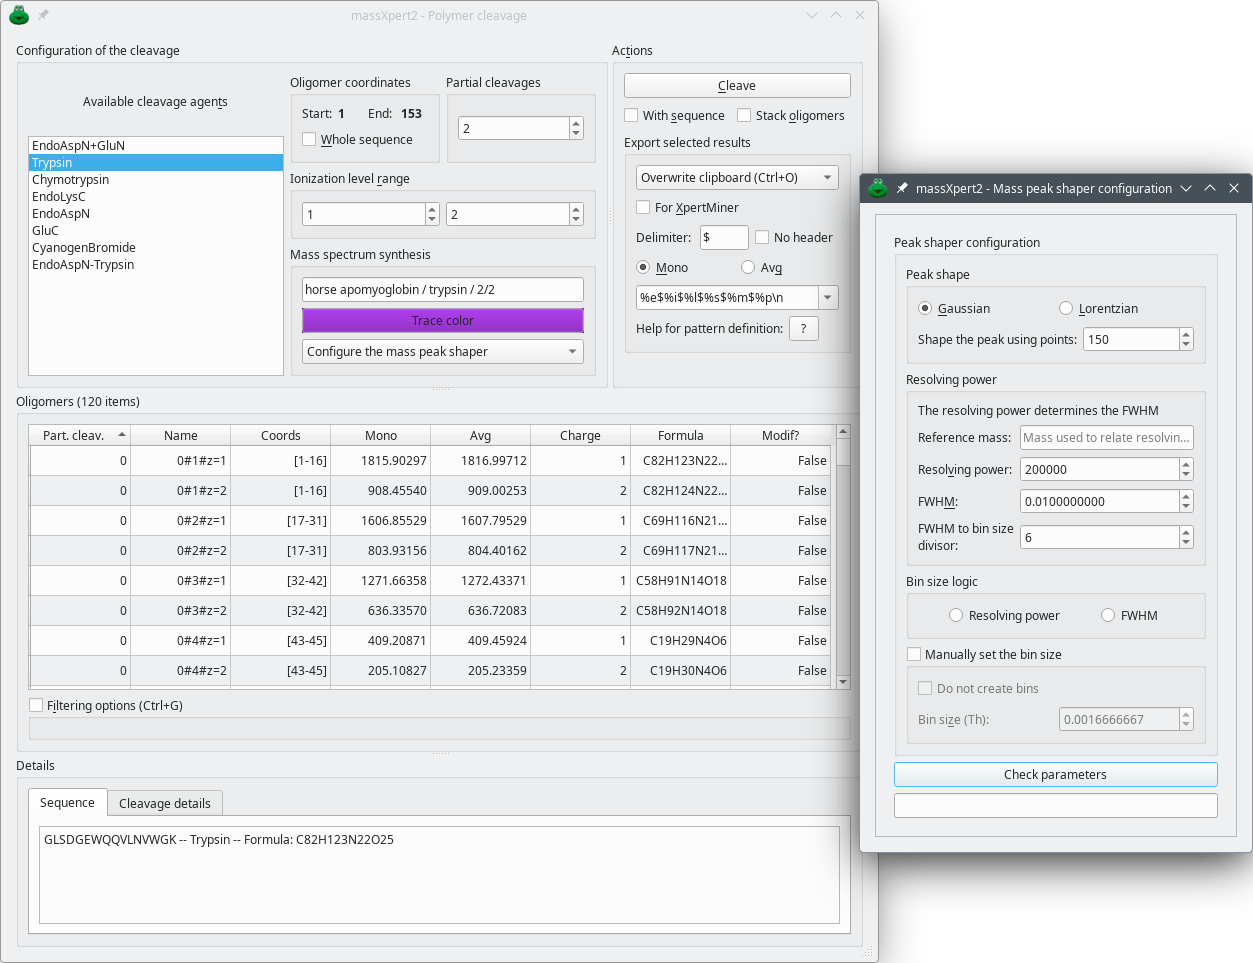
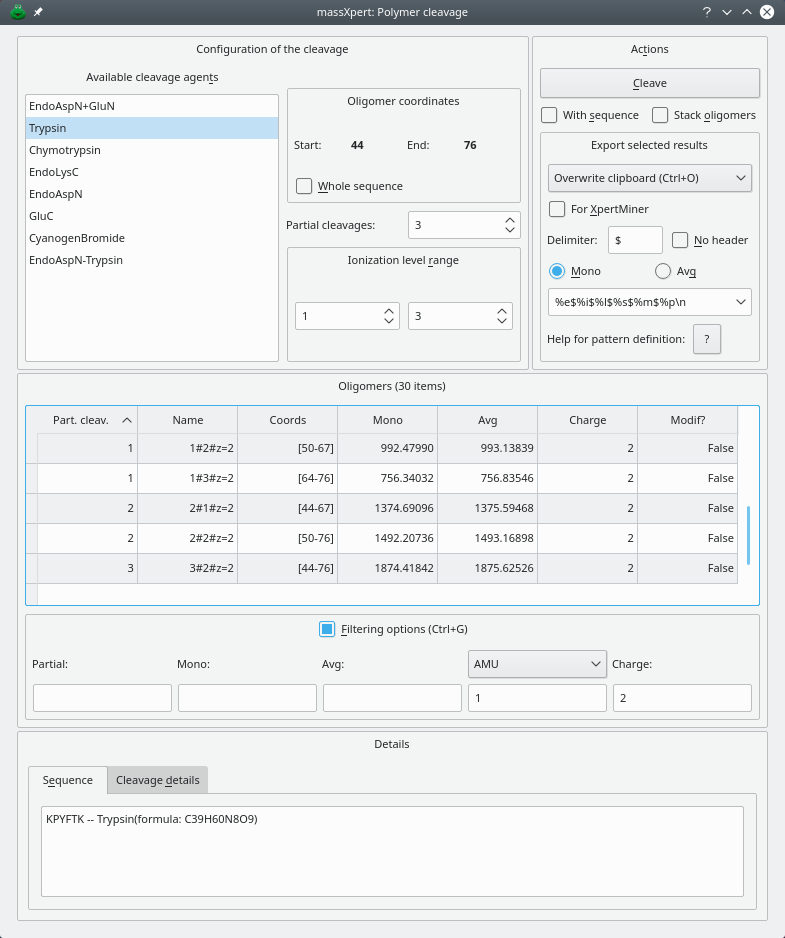
This figure shows the window in which polymer sequence cleavages are performed. One cleavage specification is selected, the number of allowed partial cleavages and the ionization level range is set. The results are displayed in the same window. The cleavage might be performed on the currently selected polymer sequence region or the whole sequence.
Figure 4.13: Polymer sequence cleavage window #
Starting a polymer sequence cleavage is a matter of having a polymer sequence opened in an editor window and selecting the → menu. The user is provided with a window where a number of cleavage specifications are listed (Figure 4.13, “Polymer sequence cleavage window”), along with options that allow customizing the production of oligomers. The parameters that can be set are the following:
Available cleavage agents: list of the cleavage agent specifications available in the polymer chemistry definition (see Section 3.2.4, “ The cleavage specifications”);
Oligomer coordinates: when the window is opened, this groupbox widget lists the coordinates of the currently selected region of the polymer sequence. Either leave the values as they are shown or check Whole sequence. If Whole sequence is checked, the cleavage will be performed over all the sequence length. Otherwise it will be performed over the sequence in the Start–End range. This feature, which was introduced in version 2.3.0, is useful so as to simulate a first cleavage of a polymer sequence and then a second cleavage of a selected oligomer using a different cleavage agent. In protein chemistry, that would be useful to explore possibilities of double sequential cleavages of a protein, first with EndoAspN, for example, and then with Trypsin.
Setting the Partial cleavages number defines if the cleavage must be total (value of 0) or if missed cleavages are allowed.
Setting the Ionization level range defines what charge state the generated oligomer will have.
A number of other features might be configured, either on the way oligomers should be exposed or on the way they should be exported to a number of destinations:
Checking With sequence tells the cleavage engine to store their sequence in the generated oligomers; see Section 4.10, “Sequence Cleavage”.
In normal operation, when multiple cleavages are performed by clicking Cleave, the new oligomer set replaces the one obtained previously. However, it might be useful to generate in the same unique list all the oligomers generated for different cleavages. To stack oligomers from different cleavages, check Stack oligomers.
It is possible to export the oligomers selected in the tableview widget in a number of ways. Select the destination in the drop down menu widget. A specific export format might be defined and the mass type to be exported might be selected. When exporting for the XpertMiner module, check For XpertMiner.

Note
If the list of monoisotopic or average masses is desired in the form of a text list, right-clicking onto the tableview widget will allow copying to the clipboard either the monoisotopic or the average masses. Also, it is possible to either export the data to the clipboard or to a file or even to drag the displayed oligomer items in a text editor. Only the selected items in the treeview widget will be exported.
Mass spectrum synthesis This group box is about the configuration of the way a mass spectrum might be calculated and displayed in another program. The Trace color button allows one to select a color with which to plot the mass spectrum's trace once exported to a mass data visualizing program (mineXpert2). The line edit widget above the button allows one to define a title for the mass spectral trace plotted. Finally, the drop down menu holds three menus, as described below:
Configure the mass peak shaper Click this menu item to display the Mass peak shaper configuration dialog window as shown on Figure 4.13, “Polymer sequence cleavage window”. The configuration of the mass peak shaper works in this dialog window exactly as described in Figure 7.6, “Setting-up of the centroid mass peak shaping process”.
Synthesize the mass spectra This button actually triggers the computation of the mass spectra (the isotopic clusters) of all the selected fragmentation oligomers currently selected in the table view. The calculation is only performed if the previous configuration step has yielded a valid isotopic cluster shaper configuration.
Mass spectrum to clipboard This menu item copies the mass spectrum to the clipboard. For this menu to be available, a mass spectrum synthesis must have been performed successfully, otherwise the menu reads Mass spectrum not yet available.
Note
Upon successful completion of a mass spectrum synthesis, the obtained mass spectral trace is automatically made available to any requesting program if and only if as server is started on the massXpert2 side and if a client is started on the mineXpert2 side. See Section 7.3, “Configuration of the network-based communications between massXpert2 and mineXpert2 ” for details. When the mass spectral trace is successfully displayed in mineXpert2 via the network, the trace color and title are honoured. When the trace is copied to the clipboard and then loaded in mineXpert2, the color and title are not transferred along with the mass spectral data.
The Details frame widget at the bottom of the window displays a number of informative data. In particular, the Sequence tab widget displays the sequence of the oligomer currently selected in the Oligomers table view along with the name of the cleavage agent which it arose from. The Cleavage Details tab widget displays the mass calculation engine configuration at the time the last cleavage was performed (checked items mean that the corresponding feature was on, unchecked items mean that the related feature was off). In the example (Figure Figure 4.13, “Polymer sequence cleavage window”), the mass calculation for the oligomers did not account for the monomer modifications nor for the left/right end modifications of the polymer, nor for the cross-links.
When the user triggers a cleavage, the mass calculation engine configuration currently set in the sequence editor is used for the calculation of the mass of the oligomers obtained per the cleavage. This process allows an easy change in the mass calculation engine configuration between one cleavage and another so as to allow comparison of masses obtained for the same cleavage but with different mass calculation engine configurations.
For oligomer data filtering, please refer to Section 4.13, “Oligomer Data Filtering”.
Tip
It is possible to display any given fragment in the polymer sequence editor simply by double-clicking its corresponding row in the table view widget.
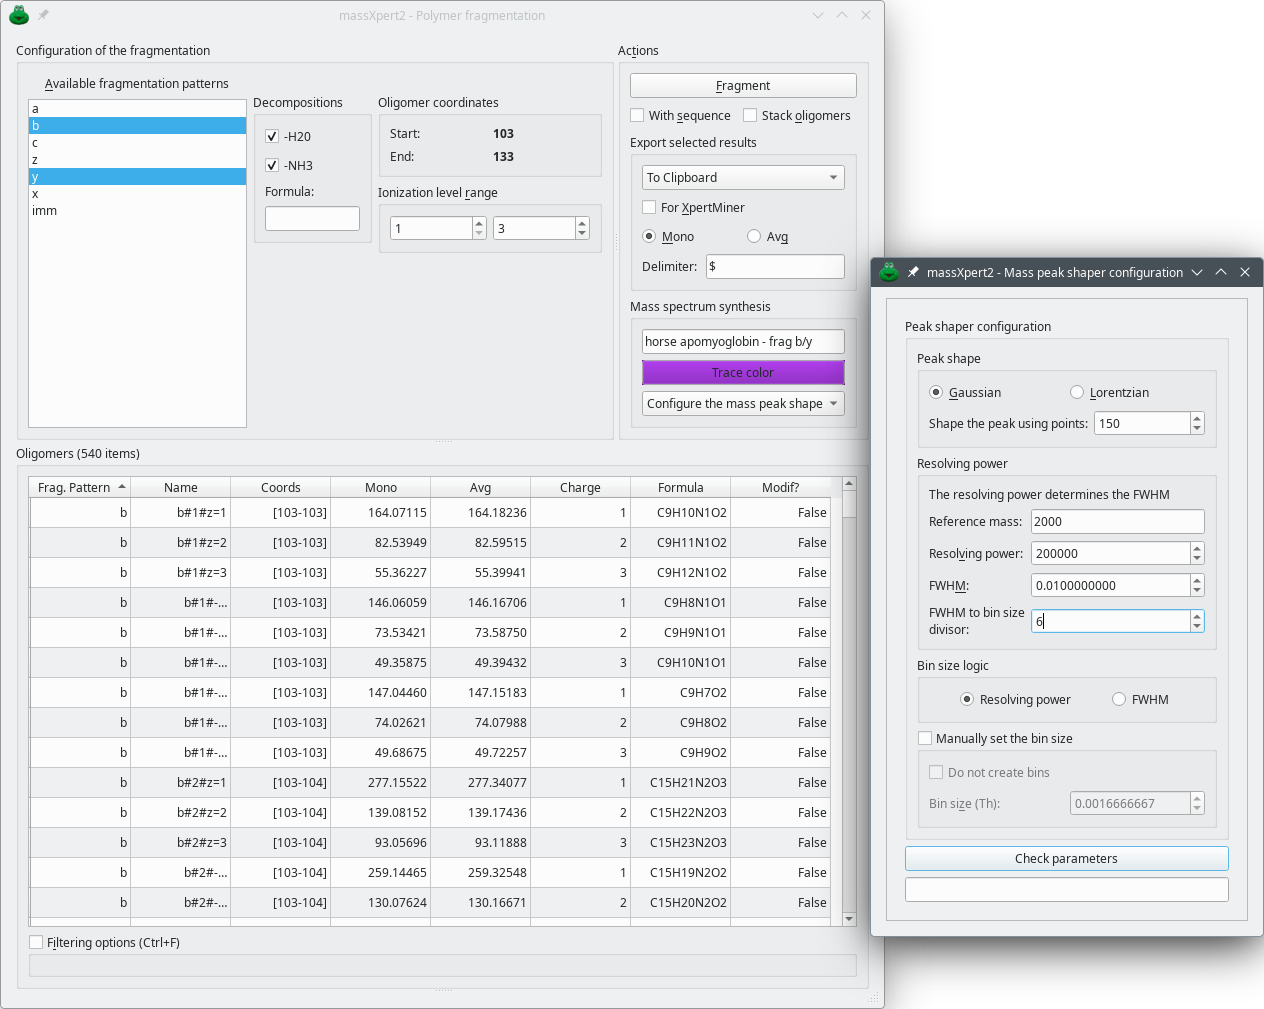
4.11 Oligomer Fragmentation #
It happens very often that polymer sequences need to be fragmented in the gas phase (in the mass spectrometer) so that structure characterizations may be performed. For protein chemistry, this happens very often in order to get sequence information for a given peptide ion selected in the gas phase. massXpert2 must be able to perform those fragmentations in silico. Let's see how an oligomer can be fragmented using massXpert2.
This figure shows the window in which oligomer fragmentations are performed. One or more fragmentation patterns might be selected in one fragmentation step.
Figure 4.14: Oligomer fragmentation window #
Starting an oligomer fragmentation is a matter of having a polymer sequence opened in an editor window, selecting the sequence region to be fragmented and finally selecting the → menu. The user is provided with a window where a number of fragmentation specifications are listed (Figure 4.14, “Oligomer fragmentation window”). As detailed for the cleavage of polymers, these fragmentation specifications are listed by looking into the polymer chemistry definition corresponding to the polymer sequence of which an oligomer is to be fragmented.
Select the fragmentation specification(s) of interest, set the ionization range required for the generated fragment oligomers (the same as for polymer sequence cleavage) and click . Upon successful termination of the fragmentation reaction, the generated fragments are displayed in the Oligomers tableview widget.
As detailed for the cleavage of polymer sequences, the Details frame widget displays data about the fragments generated and the way masses were calculated for them.
It is possible to take into account cross-links that are beared by monomers contained in the oligomer.
Warning
Only cross-links that are fully contained in the oligomer are taken into account. Partial cross-links, that is, cross-links involving at least one monomer outside of the oligomer, are ignored.
The cross-links are accounted for during the fragmentation of an oligomer if Cross-links is checked in the calculation engine configuration panel of the sequence editor window (Figure Figure 4.15, “Starting a fragmentation that accounts the cross-links”). This is a partial view of the cyan fluorescent protein, with the “TWG” chromophore tripeptide. We added a disulfide bond cross-link between two cysteinyl residues, only for the example (this is not biologial!).
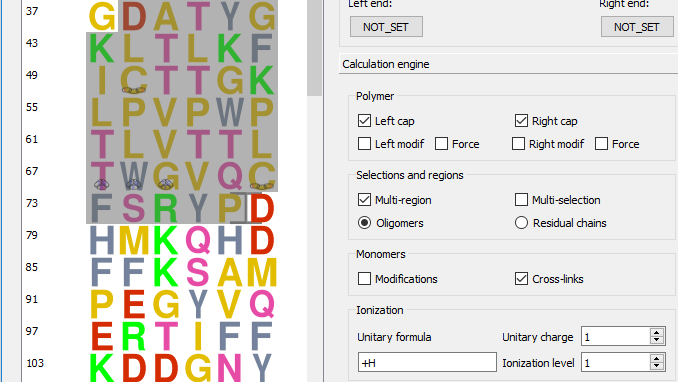
The polymer sequence in the editor is selected making sure that all the cross-links are included in it. The calculation engine is configured to account for the cross-links.
Figure 4.15: Starting a fragmentation that accounts the cross-links #
If we select the oligomer region [38–77] and that we ask for a fragmentation, the fragmentation results will take into account both cross-links only in the case the generated fragments encompass fully one or more cross-links.
The following calculation rationale applies:
Fragments b (left end) from b1 (D) to b12 (up to I) do not take into account the cross-links as both are outside of its scope;
Fragments b13 (up to C) to b34 (up to Q) do not take into account the cross-links because the outer cross-link (disulfide bond between cysteine residues) is not complete (the second cysteine is left out of the fragment);
Fragments b35 (up to C) to b40 (up to P) do take into account both cross-links because both are contained in the fragments;
Likewise, the only y fragments (right end) that do take into account the cross-links are the fragments y28 (up to C) and all the remaining, as for these fragments, the cross-links are both fully contained.
A more complex cross-linked structure example is shown in Figure Figure 4.16, “Complicated cross-linking situation”, where the 17-mer oligomer has 4 fully-encompassed cross-links and one partial. This oligomer is used as an example of how the fragmentation computation is handled my massXpert2.

This figure shows a complicated cross-linking situation with an oligomer that has five cross-links, four of which are fully encompassed by the oligomer and one that involves a monomer outside of the oligomer.
Figure 4.16: Complicated cross-linking situation #
The calculation of the fragments for this oligomer involves the following steps:
Calculate regions of the oligomer that involve cross-links either overlapping or not. The regions are thus the following: [3–5], [8–11] and [13–15]. Note that the cross-link involving monomer 12 is never taken into account as it involves also a monomer outside of the oligomer;
For fragments that have the left end of the oligomer (``Left-end nomenclature''), the following rationale is used:
Fragments →1 and →2 do not have any cross-link;
Fragments →3 to →4 do not account for cross-link a because that cross-linke is not fully encompassed by the fragments;
Fragments →5 to →10 account only for the cross-link a as this is the only cross-linked region to be fully encompassed by these fragments;
Fragments →11 to →14 account for cross-links a, b and c as they are all fully encompassed in the fragments;
Fragments →15 to →16 account for all cross-links, a, b, c, d as they are all fully encompassed in the fragments;
For fragments that have the right end of the oligomer (Right-end nomenclature), the following rationale is used:
Fragments 1← and 2← do not have any cross-link;
Fragments 3← and 4← do not account for cross-link d because that cross-link is not fully encompassed by the fragments;
Fragments 5← and 6← account for cross-link d because it is fully encompassed in these fragments;
Fragments 7← to 9← only account for cross-link d because cross-links b and c (which make one cross-linked region) are not fully encompassed by these fragments;
Fragments 10← to 14← account for cross-links d, c and b, but not for cross-link a as this last cross-link is not fully encompassed in these fragments;
Fragments 15← and 16← account for all the cross-links of the oligomer.
Warning
It is necessary to repeat one more time that cross-links that involve monomer(s) outside of the oligomer are ignored. The user is alerted whenever this situation is encountered.
The various widgets in the Actions groupbox widget are very similar to the ones found in the polymer sequence cleavage window Figure 4.13, “Polymer sequence cleavage window”).
For oligomer data filtering, please refer to Section 4.13, “Oligomer Data Filtering”.
Exactly as described for the cleavage oligomer mass spectrum synthesis, it is possible to synthesize a mass spectrum corresponding to all the fragmentation oligomers currently selected in the table view widget. This process has been described at ???.
Tip
In order to visualize a given oligomer, listed in the table view widget, inside of the sequence editor window, double-click its corresponding row; the corresponding sequence will be highlighted in the sequence editor.
4.12 Mass Searching #
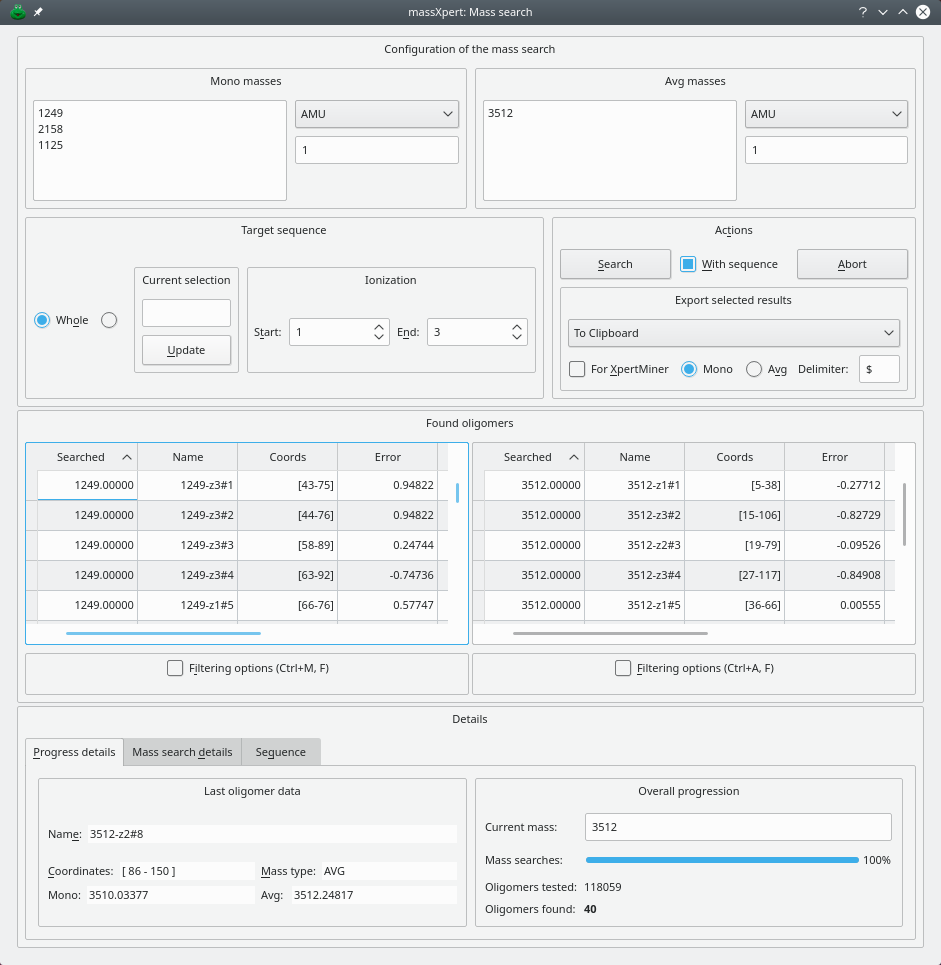
It may happen that the scientist needs to know if some arbitrary sequence region would have a given mass. massXpert2 allows for mass searching operations in the polymer sequence. This is done by using the menu →. The window illustrated in Figure 4.17, “Searching masses in a polymer sequence” shows up and the user enters masses to search for. A number of parameters are to be detailed:
Targets: should the masses be searched for in the whole sequence or in the currently selected region only?
Ionization: should different levels of ionization be calculated when calculating masses for the potential oligomers matching the searched mass? For example, one finds in an electrospray ionization experiment mass spectrum a peak at m/z 1245. It is not possible to know the ionization level for that ion. On could imagine that this value is for a monopronotonated or for a multiprotonated species. If we wanted to assess this, we might ask that the mass be searched for by computing a range of possible ionization levels between Start level 1 and End level 4 (admitting that for that experiment this is what one would expect).
Once the masses have been searched for, if results are found they are displayed in the same window in the Oligomers table view widgets (the left one for the mono masses and the right one for the avg masses).
This figure shows the window in which to search for masses in a polymer sequence.
Figure 4.17: Searching masses in a polymer sequence #
The various widgets in the Actions groupbox widget are very similar to the ones found in the polymer sequence cleavage window Figure 4.13, “Polymer sequence cleavage window”).
For oligomer data filtering, please refer to Section 4.13, “Oligomer Data Filtering”.
Tip
If you want to visualize into the sequence editor window a given oligomer, as listed in the tableview widget, double-click its item; the corresponding sequence will be highlighted in the sequence editor.
4.13 Oligomer Data Filtering #
Oligomer-generating simulations, like polymer sequence cleavages or fragmentations or mass searches, produce a very large amount of data. It is often desirable to be able to filter quickly some specific data out of these bunch of data… In all these three simulation contexts, the results that are displayed in the corresponding dialog windows are easily filtered using the mechanism illustrated in Figure 4.18, “Oligomer data filtering”. To enter filtering mode, check Filtering options; the line edit widgets will appear for you to start entering filters.
This figure shows how oligomer data can be filtered. The Filtering options groupbox contains four line edit widgets where filtering might be triggered: Partial, Mono, Avg, Charge. The filtered data are displayed in the same window (this example is for polymer sequence cleavage simulation data). Here, the filter is applied to the charge level of the oligomers, only showing those having a charge of 2.
Figure 4.18: Oligomer data filtering #
Filtering on the data is easily performed by entering the options in the Filtering options group box (Figure 4.18, “Oligomer data filtering”). For any filtering operation, only one criterium can be used, that is, for example, filtering can occur only on the basis of the monoisotopic mass or of the average mass, but not on both masses. For example, if one wanted to filter a huge set of data against a specific monoisotopic mass of 850 plus or minus 3 atomic mass units, it would simply be a matter of setting the monoisotopic mass to be 850 with a tolerance of 3 AMU in the corresponding line edit widgets contained in the Filtering options groupbox. To perform that filtering action, first set the tolerance value (3) in its line edit widget and next set the monoisotopic mass value to be 850 in the corresponding line edit widget. While the cursor is still in the Mono line edit where 850 was entered, press the keyboard key combination Ctrl–Enter. The filtering will be immediate and the table view will show the data that passed the filter. Note that the combo box widget holding the unit of the tolerance (in the example, that unit is AMU, that is, “atomic mass unit”) and the line edit widget where the tolerance value proper is set (3 in the example) do not trigger any filtering by themselves; these widgets are only useful in conjunction with other oligomer data : Mono, Avg, Error line edit widgets (depending on the dialog window the filtering occurs: cleavage, fragmentation or mass search). In our example, thus, the filtering would be spoken like this: —“Only show the oligomers for which the monoisotopic mass is 850 plus or minus 3 atomic mass units”.
To exit the data filtering mode, uncheck Filtering options and all the initial data will be displayed, irrespective of any data in the line edit widgets described above.
4.14 m/z Ratio Calculations #
In electrospray ionization, a given polymer sequence might be charged a large number of times. The tool shown in Figure 4.19, “Calculation of ranges of m/z ratios” shows how to compute a range of m/z ratios starting from one m/z value for a given charge and a given ionization agent. It is also possible to switch ionization agent on-the-fly.
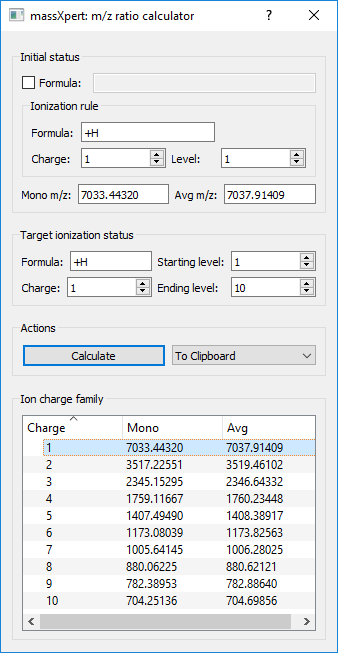
This figure shows the window in which to perform the calculation of different m/z ratios starting from one m/z value with a given ionization agent.
Figure 4.19: Calculation of ranges of m/z ratios #
4.15 Monomeric And Elemental Composition #
The → menu triggers the window shown in Figure 4.20, “Determination of the compositions”. The elemental composition is determined using the calculations engine configuration currently set in the polymer sequence editor window.
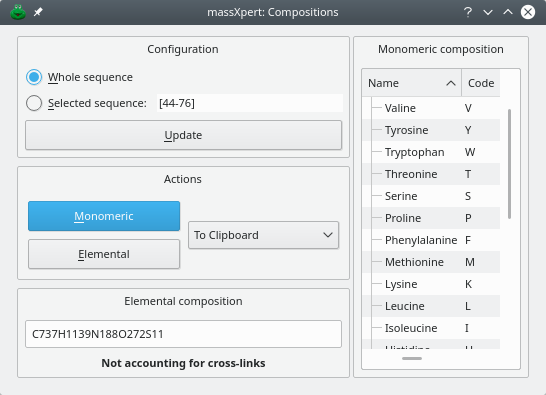
This figure shows how to determine the monomeric and elemental compositions for the whole sequence or the current selection.
Figure 4.20: Determination of the compositions #
4.16 pKa, pH, pI and Charges #
When preparing biochemical experiments, very often users need to know how many charges a given polymer sequence will bear at any given pH. Equally important is the ability to know at which pH value the polymer sequence will have a net charge near to zero. The pH value for which a given polymer sequence has a net charge near to zero (typically this means that the number of positive charges equals the number of negative charges) is called the isoelectric point—the pI.
Such computations are pretty computer-intensive and require a very
precise knowledge of the chemical structure of the different monomers that
take part in the definition of the polymer chemistry. A file, called
pka_ph_pi.xml is located in the polymer chemistry
definition directory. This file lists all the chemical groups that are
possibly charged; each monomer of the polymer definition is represented by a
<monomer> element in which data are defined for
any chemical group of that monomer that might bear a charge at any given pH.
You can find the listing of the pka_ph_pi.xml file in
. We'll discuss any aspect of
this file's contents in the next sections with enough detail that the user
will be able to write one such file for her specific polymer
chemistry.
At the moment, two entities in the polymer chemistry definition might have chemical groups bearing charges: monomers and modifications. We will first review monomers, and modifications next.
4.16.1 Ionized Group(s) In Monomers #
Monomers are the building blocks of polymer sequences. These blocks must have at least two reactive groups so that they can be polymerized into a polymer sequence thread. Reactive groups are often chargeable groups; for example, the amino group of amino-acids is such that it gets protonated (positively charged) at a pH inferior to its pKa. Similarly, the carboxylic acid group of amino-acids is deprotonated (negatively charged) at physiological pH.
4.16.1.1 Some Theory First #
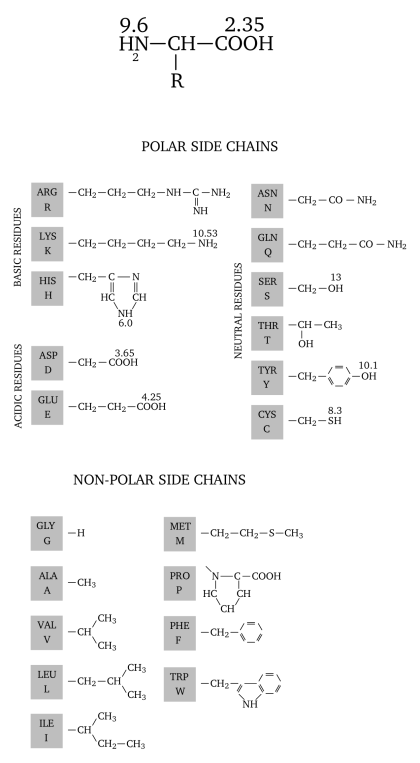
All of the twenty amino-acids are represented here, which each amino-acid's lateral chain fully represented. Above each chemical group—for which the value makes sense from a biological perspective—the pKa value is indicated.
Figure 4.21: Different pKa values for a number of amino-acids' chemical groups #
For the non-biochemist reader, amino-acids involved in the formation of proteins have always at least two chemical groups that are of inverted electrical charge, at physiological pH values (see Figure Figure 4.21, “Different pKa values for a number of amino-acids' chemical groups”):
The amino group (called αNH2) has a typical pKa value of 9.6. This means that, at physiological pH values (between 6.5 and 7.5), the amino group will find the environment rather acidic, and will thus be protonated, leading to a positively-charged species (αNH3+);
The carboxylic group (called αCOOH) has a typical pKa value of 2.35. This means that, at physiological pH values, the carboxylic group will be in a rather basic environment, and will thus be deprotonated, leading to a negatively-charged species (αCOO-).
It should be clear that, at physiological pH values the two α-chemical groups have a net charge of 0. But proteins are charged, and this is because some of the twenty common amino-acids have other chemical groups beyond the two others already described. Indeed, some amino-acids have lateral chains that bear groups that might be charged depending on the pH: seryl residues have an alcohol group that has a pKa of 13, for example; that means that it is almost always uncharged (form ROH at physiological pH values). The lateral chain of lysine has a pKa of 10.53, which means that at pH values below this pKa value, the ∊NH2 gets protonated, introducing a positive charge in the protein. Similarly, amino-acids glutamate and aspartate do have a lateral chain ended with a γCOOH and a βCOOH, respectively. Their pKa values are below 4.5, and thus the groups are negatively charged a physiological pH values.
When the net charge of a polymer sequence has to be computed for a
given pH condition, the program iterates in the sequence, and for each
monomer will check which one of its chemical group(s) is possibly
charged. For this to happen, it is required that a number of data be
known for each monomer's chemical group that might play a role in the
determination of the polymer sequence's electrical charge. Thus, for
each chemical group a number of data should be listed in the
pka_ph_pi.xml file (please, see that file in the
file):
the chemical group's <name> element is required. For example, “αNH2” or “∊NH2” or “αCOOH”;
the chemical group's <pka> element is optional, but is the basis for the charge calculation. For example, 9.6 for the “αNH2” or 2.35 for “αCOOH”;
the <acidcharged> element is required if the <pka> element is given. This element is responsible for telling if the chemical group is charged (positively) when the pH is lower than pKa (that is when the medium is acidic with respect to the pKa). For example, an amine is positively charged when it is in its acidic form (protonated); a carboxylic acid is not charged when it is in its acidic form;
there can be none, one or more <polrule> element(s) for each chemgroup. The <polrule> element gives informations about the way the chemical group at hand might be “trapped” (or not) in the formation of inter-monomer bonds (while the monomer is polymerized into the polymer sequence). The value “left_trapped” means that the chemical group ceases to be involved in charge calculations as soon as it has a monomer at its left end. The value “right_trapped” means the same as above, but when a monomer is polymerized at its right end. For a chemical group that is “left_trapped”, we understand that it is only effectively evaluated if it is at the left end of the polymer sequence, since in this case it does not have a monomer at its left side. Conversely, a chemical group that has a <polrule> element with value “right_trapped”, will be evaluated only if the monomer is actually the right end monomer in the polymer sequence. Finally, the typical lateral chains of amino-acids have a <polrule> element with a value “never_trapped”, as these chemical groups do not take part in the formation of the inter-monomer bond;
there can be none, one or more <chemgrouprule> element(s) for each chemgroup. A chemgrouprule element should contain the following:
there must be an <entity> element that indicates what is the chemical entity being dealt with in the current chemgroup element. Valid values for this element are “LE_PLM_MODIF”, “RE_PLM_MODIF” or “MNM_MODIF”;
there must be a <name> element naming the chemical entity properly;
there must be an <outcome> element telling what action should be taken when encountering the <entity> on the chemgroup. Valid values are either “LOST” or “PRESERVED”.
4.16.1.2 Understanding By Example #
Let us take some examples in order to make sure we actually understand the process of describing how an electrical net charge is calculated for a given polymer sequence and at any given pH value.
Let us see the example of the aspartate amino-acid, of which the lateral chain is nothing but CH2COOH:
<monomer>
<code>D</code>
<mnmchemgroup>
<name>N-term NH2</name>
<pka>9.6</pka>
<acidcharged>TRUE</acidcharged>
<polrule>left_trapped</polrule>
<chemgrouprule>
<entity>LE_PLM_MODIF</entity>
<name>Acetylation</name>
<outcome>LOST</outcome>
</chemgrouprule>
</mnmchemgroup>
<mnmchemgroup>
<name>C-term COOH</name>
<pka>2.36</pka>
<acidcharged>FALSE</acidcharged>
<polrule>right_trapped</polrule>
</mnmchemgroup>
<mnmchemgroup>
<name>Lateral COOH</name>
<pka>3.65</pka>
<acidcharged>FALSE</acidcharged>
<polrule>never_trapped</polrule>
<chemgrouprule>
<entity>MONOMER_MODIF</entity>
<name>AmidationAsp</name>
<outcome>LOST</outcome>
</chemgrouprule>
</mnmchemgroup>
</monomer>
We see that the code of the monomer for which acid-basic data are being defined is “D” and that this monomer has three chemical groups that might bring electrical charges. These chemical groups are described by three <mnmchemgroup> elements that we will review in detail below (see Figure 4.21, “Different pKa values for a number of amino-acids' chemical groups”).
The first <mnmchemgroup> element is related to the αNH2 amino group of the amino-acid:
<name>N-term NH2</name> The name of the chemical group is not immediately useful, but will be used when reports are to be prepared for the calculation;
<pka>9.6</pka> This element is optional. However, of course, if the chemical group might be electrically charged, the pKa value will be essential in order to compute the charge that is brought by this chemical group at any given pH;
<acidcharged>TRUE</acidcharged> This element is also optional, however, if the previous element is given, then this one is compulsory. Telling if the conjugated acid form is charged (that is protonated) is essential in order to know what sign the charge has to be when the chemical group is ionized. The value “TRUE” indicates that when the pH is lower than the pKa, the chemical group is charged, thus protonated (in the form NH3+). Consequently, if the pH is higher than the pKa, the chemical group is neutral (in the form NH2);
<polrule>left_trapped</polrule> This element indicates that the chemical group should only be taken into account in the eventuality that the monomer bearing it (code “D”) is the left end monomer of the polymer sequence. This can easily be understood, as this chemical group is responsible for the establishment of the inter-monomer bond towards the left end of the polymer sequence;
<chemgrouprule> This element provides further details on the chemistry that this chemical group might be involved in:
<entity>LE_PLM_MODIF</entity> This element indicates that the supplementary data in the current <chemgrouprule> element are pertaining to the αNH2 chemical group only in case the polymer sequence is left end-modified (that is with a permanent left end modification) and the monomer (code “D”) is located at the left end of the polymer sequence (that is: it is the first monomer of the sequence for which the electrical charge—or pI—calculation is to be performed).
<name>Acetylation</name> This element goes further in the detail of the potential chemistry of the αNH2 chemical group: if the left end permanent modification is “Acetylation”, then the current chemgrouprule element can be further processed, otherwise it should be abandoned;
<outcome>LOST</outcome> This element actually indicates what should be done with the chemical group for which the chemgrouprule is being defined. What we see here is: —“If the αNH2 chemical group, belonging to a ‘D’ monomer located at the left end of a polymer sequence, is modified permanently with an ‘Acetylation’ left end modification, it should not be taken into account when computing the charge that it could bring to the polymer sequence”.
The second <mnmchemgroup> element is related to the αCOOH carboxylic group of the amino-acid:
<name>C-term COOH</name> Same remark as above;
<pka>2.36</pka> Same remark as above;
<acidcharged>FALSE</acidcharged> Same remark as above. However, as we can see, the value indicates that the acid conjugate (form COOH) does not bring any charge. This means that when the basic conjugate is predominant (that is when pH > pKa), it brings a negative charge: the form is COO-;
<polrule>right_trapped</polrule> The chemical group should not be evaluated if a monomer is linked to it at its right side. That means that the current chemical group is only evaluated if the monomer bearing it is located at the right end of the polymer sequence. This is easily understood, as the αCOOH chemical group is involved in the formation of the inter-monomer bond towards the right end of the polymer sequence.
The third <mnmchemgroup> element is related to the βCOOH carboxylic group of the amino-acid:
<name>Lateral COOH</name>;
<pka>3.65</pka>;
<acidcharged>FALSE</acidcharged>;
<polrule>never_trapped</polrule> This element indicates that, whatever the position of the monomer bearing the chemical group in the polymer sequence (left end, right end or middle), the chemical group is to be evaluated;
<chemgrouprule> This element provides further details on the chemistry that the chemical group at hand (βCOOH) might be involved in:
<entity>MONOMER_MODIF</entity> This element indicates that the supplementary data in the current <chemgrouprule> element are pertaining to the βCOOH chemical group only in case the monomer bearing the chemical group is chemically modified;
<name>AmidationAsp</name> This is the modification by which the monomer should be modified in order to have the <chemgrouprule> element effectively evaluated;
<outcome>LOST</outcome> This element actually indicates that if the monomer bearing the chemical group is modified with an “AmidationAsp” chemical modification, then the chemical group should not be evaluated any more for the electrical charge —or pI— calculations, since reacting a carboxylate group with an amino group produces an amide group which is not easily chargeable at physiological pH values.
At this point we should have made it clear how the charge calculations can be configured for the different monomers in the polymer chemistry definition. As usual, the more the polymer chemistry definition is sophisticated, the more sophisticated the computations are allowed.
4.16.2 Ionized Group(s) In Modifications #
In the excerpt from the pka_ph_pi.xml file
below, we see that chemical modifications can also bring charges. The
example of the chemical modification “Phosphorylation” shows
that when a monomer is phosphorylated, two chemical groups are brought in:
the first has a pKa value of 1.2 (that is it will always be deprotonated
at physiological pH values), the second has a pKa value of 7 (that is it
will be divided by half in a protonated (not charged) form and in an
un-protonated (negatively charged) form, leading to a net electrical
charge of -0.5.
<modif>
<name>Phosphorylation</name>
<mdfchemgroup>
<name>none_set</name>
<pka>1.2</pka>
<acidcharged>FALSE</acidcharged>
</mdfchemgroup>
<mdfchemgroup>
<name>none_set</name>
<pka>6.5</pka>
<acidcharged>FALSE</acidcharged>
</mdfchemgroup>
</modif>
At this point we should be able to study the way computations are actually performed in the XpertEdit module.
4.16.3 pH, pI and Charge Calculations #
The user willing to compute charges (positive, negative, net) or the isoelectric point for the current polymer sequence uses the menu → which triggers the appearance of the window shown in Figure 4.22, “Acido-basic computations: net charges”.
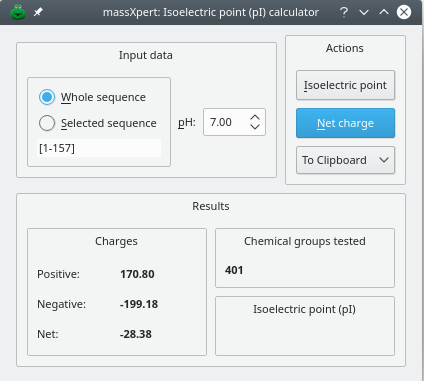
This figure shows the options that can be set for the calculation of the charges beared by the polymer sequence.
Figure 4.22: Acido-basic computations: net charges #
This figure shows that the user can calculate the charges (positive, negative and net) beared by the polymer sequence (either the whole sequence or the current selection) by setting the pH value at which the computation should take place. It is also possible to calculate the isoelectric point by clicking onto the button.
Note that the computations might involve the permanent left/right modifications of the polymer sequence, as well as the monomer chemical modifications. To configure the way net charge—or pI—calculations are performed, use the calculations engine configuration of the sequence editor window.
4.17 General Options #
One of the options that are valued most by users is to be able to set the number of decimal places used to diplay numbers. The settings should apply in a distinct manner depending on the different entities for which numerical values are to be displayed. The following are the default values (and recommended ones):
Atoms (and all related entities (isotopic masses, isotopic abundances): 10;
pKa, pH, pI: 2;
Oligomers (obtained via mass searches, polymer cleavages, oligomer fragmentations): 5;
Polymers : 3;
Note that modifying these values will allow immediate change of the way numerals are displayed, without needing to restart the program. Only triggering a new cleavage or a new fragmentation will update the data display according to the new options set. These options are stored on the disk and are permanent.
[7] Once the sequence is saved, the polymer chemistry definition file must be registered or the sequence file will not be loadable. This is described in a later chapter.
[8] “Selection”, here, is thus used to collectively represent all multi-region selections and multi-selection regions at any given time in the polymer sequence editor.